

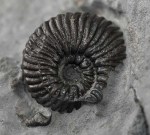
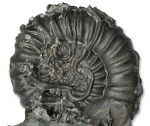
Microderoceras birchi, width of view 4 cm
A Microderoceras birchi, shell fully preserved, with a tiny little ammonite sitting on one of the spines.
The most difficult way to prep an ammonite is to try to keep its shell on – making it look almost like it used to when the animal was still alive. The ability to do so of course depends on a few things. First and foremost : The shell has to be preserved (obvious). Then there has to be a way to separate shell and matrix without the internal mould inside the shell separating from the shell first. For this to be possible there are a few conditions :
- The shell has to be relatively solid
- There has to be a difference between matrix and shell, be it in terms of hardness or chemistry
- There has to be a way to use this difference to remove the matrix without damaging the shell too much.
For shell preserved ammonites in soft clays, washing and brushing is the easiest version where these conditions are true. The only problem is : None of the beds in the Yorkshire liassic are soft clays…
Most shell preserved ammonites in Yorkshire come from more or less hard nodules that formed around the decaying animal. With some of the nodules, especially from some beds in the upper sinemurian, it is the hardness difference between shell and nodule that can be used to extract an ammonite with shell more or less intact.
Generally ammonite shells are most commonly preserved in calcite that was transformed from the original aragonite. Calcite has a Mohs hardness (a relative scale of hardness from 1 to 10 with diamond being 10) of 3 – not really all that much, considering that the steel of a chisel or a prep needle has a Mohs hardness of between 5.5 and 6.5.
So using a prep needle, you can scrape softer matrix off the shell, but you will always scratch it more or less, depending how careful you work.
In recent years, air abrasive techniques have become affordable for collectors, in essence shooting small abrasive medium particles at the fossil using a compressed air stream, like a million tiny needle-pricks. The elegant thing about air abrasive technique is that you can (within boundaries) tailor your air abrasive medium to the hardness difference between matrix and fossil. A more commonly used abrasive medium is iron powder with a hardness of about 4, but almost anything is possible e.g. walnut shell powder , glass, aluminium oxide. Iron powder is quite popular in Germany because it is just slightly harder than calcite (it will “smear” ammonite shell just a bit) but harder than most soft shales, or oolithic sediments with a high silt content, is relatively cheap, and quite recyclable, i.e. you can re-use it many times. Another quite commonly used medium is aluminium oxide which you can use on harder matrices like limestone nodules as well, but with a Mohs hardness of 9, it will easily shoot holes through your fossil if you’re not really careful.
Here are some more examples of what can be done using iron powder air abrading:
-
- Angulaticeras sulcatum, 7 mm
-
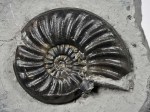
- Asteroceras obtusum, 6 cm
-

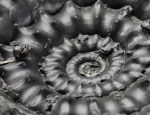
- Gagaticeras neglectum, 5 cm
-
- Microderoceras birchi, width of view 4 cm
-
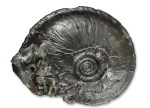
- Oxynoticeras simpsoni, 5 cm
-
- Gagaticeras sp., encrusted with tubeworms, 5 cm
When there are chemical differences between fossil and matrix they can sometimes be used to prep fossils as well – which we’ll explore sometime later…
AndyS
